Projector Keystone Correction: How It Works and How to Use It
You put your projector on a side table next to the sofa and angle it toward the screen. The left side of the image is taller than the right. You turn on auto keystone correction, but the picture still looks crooked. Then you move the same projector to a bedside table and tilt the lens slightly upward. This time, the image, which was wider at the top, quickly becomes rectangular. Why does auto keystone correction work differently when you move the same projector?
It depends on the direction of the distortion and which directions your projector can correct automatically. Some models can automatically fix vertical keystone distortion when the projector is tilted upward, but they require manual adjustment for horizontal distortion caused by side projection. This guide explains how projector keystone correction works, how to choose the right setting based on the shape of the image, and how to keep the picture as sharp as possible while correcting it.
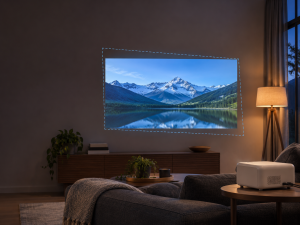
What Is Projector Keystone Correction and How Does It Work?
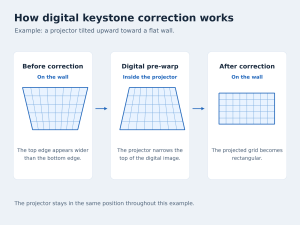
Projector keystone correction turns a trapezoidal image caused by angled projection back into a rectangle. A projected grid makes this easier to understand. Imagine the top row of the grid looks wider than the bottom row on the wall. The projector first narrows the top row in the digital image. When the image is projected at an angle, the top stretches out again. The two changes offset each other, making the grid look rectangular again.
This process changes how the image pixels are distributed. An image that originally filled the entire display area may use only part of that area after correction. That’s why the edges can look straight while the visible picture becomes smaller.
What Are the Pros and Cons of Keystone Correction?
Pros
- It gives you more flexibility with placement. You can use a ceiling mount, bedside table, coffee table, or bookshelf without having to position the projector directly in front of the center of the screen.
- It’s easy to use. A few adjustments with the remote may be enough, and some projectors can make the adjustment automatically.
- It’s a practical fix when you have limited room to change the projector’s position or angle.
Cons
- Digital correction scales the image and uses interpolation, which reduces the number of pixels used to display it. The larger the adjustment, the more noticeable the loss can be.
- Edges may look jagged after correction, especially around subtitles and thin lines.
- The visible image may shrink slightly, and the corrected image may use slightly less of the projector’s available light output.
- Keystone correction works best as a final adjustment after you’ve positioned the projector as well as the room allows.
What Types of Keystone Distortion Are There?
There are three common types:
- Vertical keystone distortion. When the projector is placed high or low and tilted toward the screen, the top and bottom edges can become different widths. This is the most common type and often occurs when a projector sits on a table and points slightly upward.
- Horizontal keystone distortion. When the projector is placed off to the left or right and angled toward the screen, the two sides can become different heights. This is common when the projector sits beside the sofa or near a side wall.
- Combined keystone distortion. Vertical and horizontal distortion occur at the same time, leaving the corners out of square. Four-corner correction, also called four-point correction, lets you adjust each corner individually.
Another issue can look similar at first. If the edges of the image bow inward or outward, you may be seeing pincushion or barrel distortion. These are types of lens distortion that fall outside the scope of standard keystone correction.
How Does a Projector with Keystone Correction Work?
The exact method varies by model, but the process generally has three steps:
- With manual correction, you judge the distortion by looking at the picture. With automatic correction, the projector uses sensors. For vertical correction, a gyroscope or accelerometer typically detects the projector’s tilt. Some models also use a camera or a distance sensor to help detect screen edges and estimate horizontal distortion.
- The projector uses the tilt angle or the detected positions of the four corners to calculate how much to reshape the image in the opposite direction.
- The image processor reshapes each frame before sending it to the optical engine for projection.
With auto keystone correction, the projector handles the part you would otherwise do by eye. Once the correction amount is set, the projector uses the same basic image adjustment process as it does in manual mode.
How Can You Tell Which Type of Keystone Distortion You Have?
| What the image looks like | Type of distortion | Common setup | How to adjust it |
| The top is wider than the bottom, or the bottom is wider than the top | Vertical keystone distortion | Projecting upward from a low table or downward from a high shelf | Adjust the projector’s height or tilt first, then use vertical correction |
| The left side is taller than the right, or the right side is taller than the left | Horizontal keystone distortion | Projecting at an angle from beside the sofa | Reduce the side angle first, then use horizontal correction |
| The top and bottom have different widths, and the left and right sides have different heights | Combined vertical and horizontal distortion | Projecting both upward and sideways from a low side table | Improve the placement first, then use two-axis or four-corner correction |
Two other problems can also make the picture look crooked. If the whole rectangle appears tilted like a picture frame hanging at an angle, check whether the projector or its mount is leaning to one side. If the image is rectangular but sits off to one side of the screen, move the image into position. Identifying the problem first saves time adjusting vertical and horizontal settings.
How Do the Different Keystone Correction Settings Work?
Vertical correction adjusts the relative widths of the top and bottom edges. Horizontal correction adjusts the relative heights of the left and right edges. If your projector supports manual four-corner correction, you can usually move the top-left, top-right, bottom-left, and bottom-right corners separately. If three corners already line up with the screen and only the bottom-right corner is off, you can fine-tune that corner on its own.
Once the image is rectangular, you can adjust its position and size to fit the screen frame or use automatic screen fitting if your projector supports it. On a plain white wall, the main things to check are the shape and position of the image. With a fixed screen, also check whether all four edges line up with the frame.
Auto vs. Manual Keystone Correction: Which Should You Choose?
| What to compare | Auto keystone correction | Manual keystone correction |
| How it works | Runs automatically at startup or after the projector is moved, depending on the model | You make adjustments with the remote or through the settings menu |
| Ease of use | Easy to use when several people share the projector or it moves often | May take a few tries to get the picture right |
| Accuracy | Vertical correction is generally accurate. Horizontal correction depends on the model’s sensors | You can fine-tune the image until it looks right |
| Best suited to | Portable use, camping, or moving between the bedroom and living room | A ceiling-mounted projector or another permanent setup |
| Common limitations | On models that look for screen edges, a dark room, unclear screen boundaries, or a cluttered wall may make detection harder | It’s easy to overcorrect if you don’t have a clear reference |
| Effect on picture quality | Large digital adjustments reduce the number of pixels used to display the image | The same applies when you make a large digital adjustment manually |
We recommend auto keystone correction if you move your projector often. For a fixed setup, it helps to have both automatic and manual controls. Let the automatic setting make the main adjustment, then use the manual controls to fine-tune the edges.
How to Fix a Crooked Projector Image with Vertical and Horizontal Correction
- Adjust the projector’s position first. Point it as straight at the screen as possible, with the lens roughly level with the center of the image if your setup allows. Use the adjustable feet or a stable riser to level the projector. Fix as much of the distortion as you can by changing its position.
- Turn on auto keystone correction if your model supports it. Give the projector time to finish the adjustment.
- Fine-tune the vertical correction. Find Vertical Keystone or Vertical Correction in the settings. If the top edge is too narrow, adjust until the top and bottom edges are the same width.
- Fine-tune the horizontal correction. Use the horizontal setting to make the left and right edges the same height.
- Finish with four-corner correction if needed. If individual corners are still out of square, open the four-point correction menu and adjust the corners one at a time.
- Check the focus. Once the image is straight, check the center and edges again. Adjustments to the setup can affect how sharp different parts of the picture look.
A test image with a grid or a clear rectangular border makes these adjustments easier than a movie scene does.
Does Keystone Correction Reduce Picture Quality?
It can, depending on how much correction you use. Digital keystone correction scales and reshapes the image. When a native 1080p image is compressed and reshaped, pixels near the edges may no longer line up one-to-one with the original image. This can make edges look slightly soft or jagged. With a small adjustment, the difference may be hard to see. With a large adjustment, subtitle edges can look noticeably softer.
Our advice is to keep the adjustment small and position the projector as straight as possible first. Brightness, contrast, and native resolution still play the biggest roles in overall picture quality. Using only as much correction as you need helps preserve detail.
Keystone Correction vs. Lens Shift
These two features are easy to confuse.
- Keystone correction digitally reshapes the image, which can reduce the number of pixels and the amount of light used for the visible picture.
- Lens shift physically moves the lens to reposition the image. The picture keeps its shape and resolution, and the adjustment itself leaves the brightness unchanged.
Lens shift is more common on mid-range and higher-end models and professional installation projectors. It usually adds to the price, and the more complex optical design can make the projector larger. For most home setups, good placement and digital keystone correction are enough. If the projector will stay in one place and picture quality is a priority, such as in a dedicated home theater, lens shift is worth considering.
How to Choose a Projector with the Right Keystone Correction Features
We recommend checking the following:
- Correction range. Check how many degrees the projector supports for vertical and horizontal correction. A wider adjustment range gives you more flexibility with placement.
- Automatic and horizontal correction.Many projectors only correct vertical distortion automatically. Horizontal correction may still need to be adjusted by hand, so check both before you buy.
- Four-corner correction. Look for this feature if you need to adjust individual corners when the image has both vertical and horizontal distortion.
- Native resolution. Look for native 1080p or higher if you want more picture detail to work with after correction.
- Digital correction can reduce the light used for the visible image. If the room gets a lot of ambient light, a higher lumen rating gives you more room to work with.
- Related features. Autofocus, screen recognition, and obstacle avoidance can make setup easier. See our Projector Buying Guide for more details. (Internal link.)
How Does Keystone Correction Work on Magcubic Projectors?
Magcubic, a projector brand under Xinyihui, offers models designed for different uses.
- Magcubic HY350MAX.This model has native 1080p resolution, 600 ANSI lumens, and Android 14. It supports auto keystone correction, obstacle avoidance, and screen recognition, making it suitable for portable and outdoor use where the projector is moved often. Once the projector is in place, it can detect the projection area and adjust the picture automatically, saving you from resetting the values by hand each time.
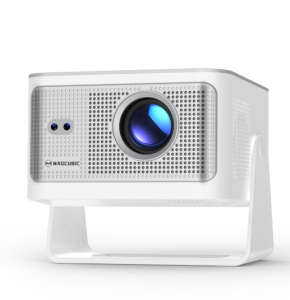
- Magcubic HY450GT.This model has native 1080p resolution, 800 ANSI lumens, Google TV, and autofocus. It’s suited to viewers who want a bright image on a large screen. See the product page for keystone correction details.
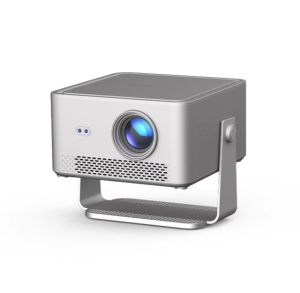
- Magcubic M800 and M800GT.Both models have native 1080p resolution and are rated at 840 ANSI lumens (±10%). The M800 runs Android 14 and features a fully sealed optical engine that helps keep dust away from the optics. The M800GT comes with Google TV. For a fixed home theater setup, position the projector as straight as possible and use only a small amount of keystone correction to preserve picture detail.
Projector Keystone Correction FAQs
Why Do Some People Recommend Avoiding Digital Keystone Correction?
Digital correction reduces the number of pixels used to display the picture. A small adjustment usually has a limited effect on image quality. The biggest loss comes when you use heavy correction to make up for a steep projection angle. Position the projector as straight as you can, then correct whatever distortion remains.
Why Is My Projector’s Auto Keystone Correction Not Working?
First, check that auto keystone correction is turned on. If your model only supports automatic vertical correction, adjust horizontal distortion manually. Make sure the projector is steady and its sensors are clear. On models that detect screen edges, low light or too little contrast between the screen border and the wall can make detection harder. Checking these points will help you narrow down the cause.
Why Is the Image Still Crooked After Keystone Correction?
You may have corrected the vertical distortion while the horizontal distortion is still visible. If the whole image is tilted, check whether the table is level or the projector is leaning to one side. An uneven wall or screen can also affect the shape of the image. If you see both vertical and horizontal distortion, use four-corner correction to adjust the corners individually.
What Is the Difference Between Auto Focus and Auto Keystone Correction?
Auto focus makes the picture sharp. Auto keystone correction makes it rectangular. Auto focus adjusts the lens focus so text and details look clear. Auto keystone correction adjusts the shape of the image. Many projectors have both features, and each handles a different part of the setup.
Do I Need to Recalibrate Keystone Correction After Moving My Projector?
Yes, if moving the projector changes its position or angle enough to change the shape of the image. Models that support automatic correction after movement can recalibrate on their own. With manual correction, you’ll need to adjust the settings again. If you move your projector often, automatic correction can save you time.